CGE PRO HD Computerised Telescope
Our telescope is a Celestron C14. Capable of up to 90 lbs of payload, including Celestron's 14-inch EdgeHD optical tube. Feel free to add accessories, guidescopes, CCD cameras, filter wheels, and more; CGE Pro's motors and 3-inch tripod legs will handle the load with ease. Technologies in the telescope include All-Star Polar Alignment, SkyAlign, StarBright XLT optical coatings, Fastar compatibility, and more. This is as big a telescope as can be bought, unless a Dobsonian mount is used. The motorised mount which is used is called a German Equatorial Mount (GEM). It is T-shaped, with the lower bar being the right ascension axis and the upper bar being the declination axis. The telescope is fixed on one extremity of the declination axis and a counterweight is placed opposite it.


Windscreen Motors
We bought two sets of windscreen wiper motors in the end. This is because the first set burnt out when we were playing about with the amperage. The motors are capable of exerting a torque in the 10Nm -20Nm range which is perfect for our dome. View the video about how we calculated the minimum torque required to get the dome rotating HERE. Plus, the development of the whole dome rotating mechanism can be viewed HERE.
Making of the hinges
The hinge idea went through many stages of development, from the initial design of a slide which would be screwed into the wood, to a Roman style ratchet mechanism to tense ropes, all the ideas were good, but we ultimately opted for a hinged panel supporting the motor which would be screwed into the wall of the dome and pressed with the help of a spring. The making of the hinges was pretty tough, everything had to be built with to the millimetre precision. I did mess up one panel, but in the end Sunayana managed to get rebuild it and we had two swivelling motors, did they work? Of course they did, check it out HERE


Toothed Gear Mechanism and Timing belt
Lots of glue, patience and a clogged nose is what you need for this job. Sticking the timing belt a full 10m along the metal ring. Rust half a centimetre thick had to be removed from the ring before gluing the belt. Metre by metre, glue had to be applied onto the ring and the belt, then after a minute wait the two would be sticked together, making sure that no bubbles remained. Then it was a question of putting pegs and making sure that the belt was always at 1mm from the top of the ring.
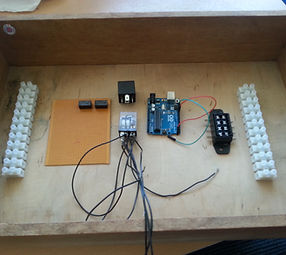
Fuse Box